Introduction
Welcome, Nextrader! Are you looking to elevate your Deriv trading experience, especially on the dynamic Volatility Indices? This comprehensive tutorial will guide you step-by-step through setting up an automated trading bot on Nextrader.live to trade V75 Rise/Fall contracts using our powerful Volatility Pulse (Bollinger Bands) strategy, expertly managed by the intelligent Mesa Milano money management system.
By the end of this guide, you'll be able to configure your very own deriv bot, leveraging Nextrader's real-time non-repaint signals to execute trades automatically on your Deriv account. We'll cover everything from connecting your account to fine-tuning your strategy, empowering you to automate your trading with confidence and precision. This tutorial is perfect for both new and experienced traders eager to utilize advanced deriv trading tools to optimize their market approach.
What You Need Before Starting
- A Deriv Account: You'll need an active Deriv.com account (demo or real) to connect to Nextrader.
- A Nextrader Account: Access our 100% free platform at app.nextrader.live – no subscriptions, no paywalls, all features unlocked.
- Basic Understanding: Familiarity with Rise/Fall contracts on Deriv and the general concept of Bollinger Bands (which the Volatility Pulse strategy utilizes) will be beneficial.
Step 1: Accessing Nextrader and Connecting Your Deriv Account
Your first step is to get logged into Nextrader and establish a secure connection with your Deriv trading account. This connection is crucial for Nextrader to execute trades on your behalf via the Deriv WebSocket API.
1. Navigate to Nextrader: Open your web browser and go to app.nextrader.live. If you haven't already, you can quickly sign up for a free account at app.nextrader.live/signup. Remember, Nextrader is 100% free, offering all its powerful deriv trading tools without any hidden costs.
Get Live AI Trading Signals
Real-time non-repaint signals powered by 11 professional AI strategies. Volatility Indices, Forex, Gold & Crypto — no subscription, no paywall.
- Auto Trader Bot
- Digit Trader Bot
- 11 AI Strategies
- Live Telegram Signals
2. Login: Enter your credentials to log in to your Nextrader dashboard.
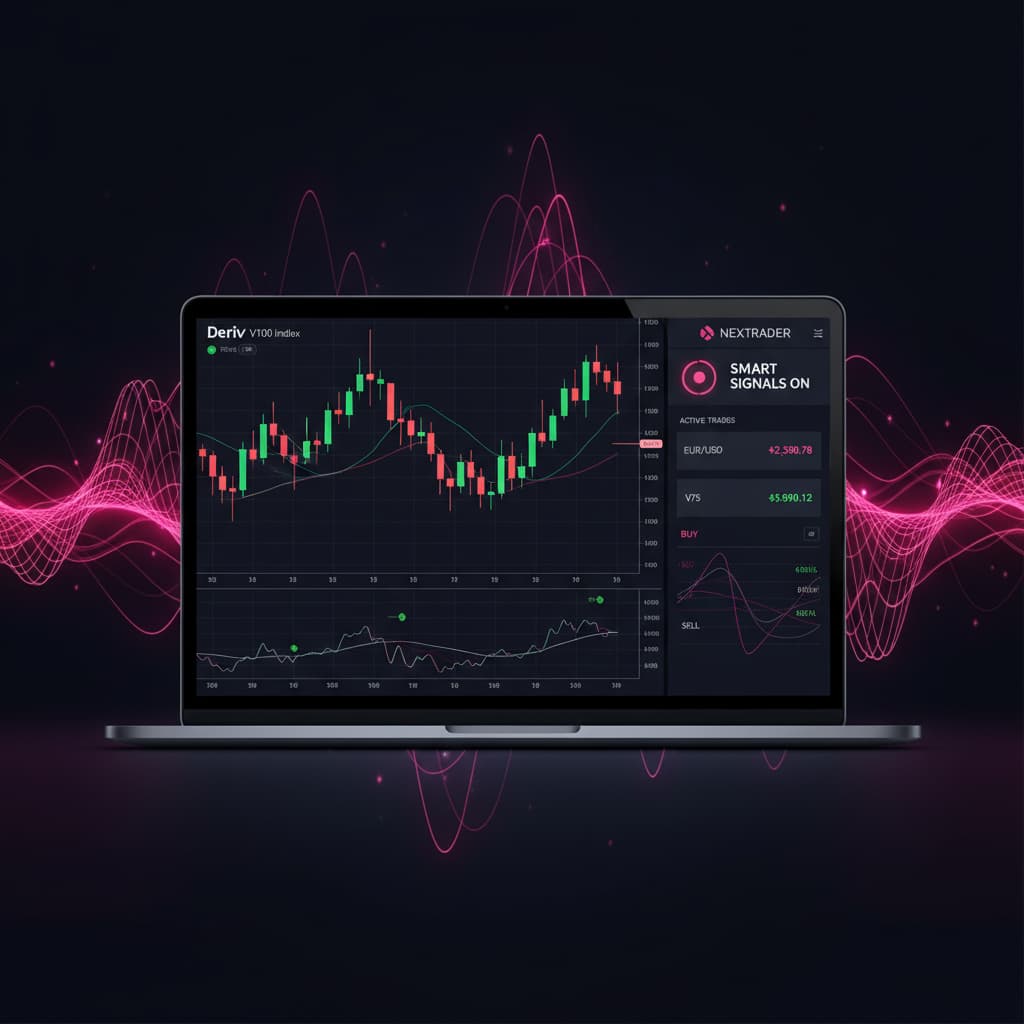
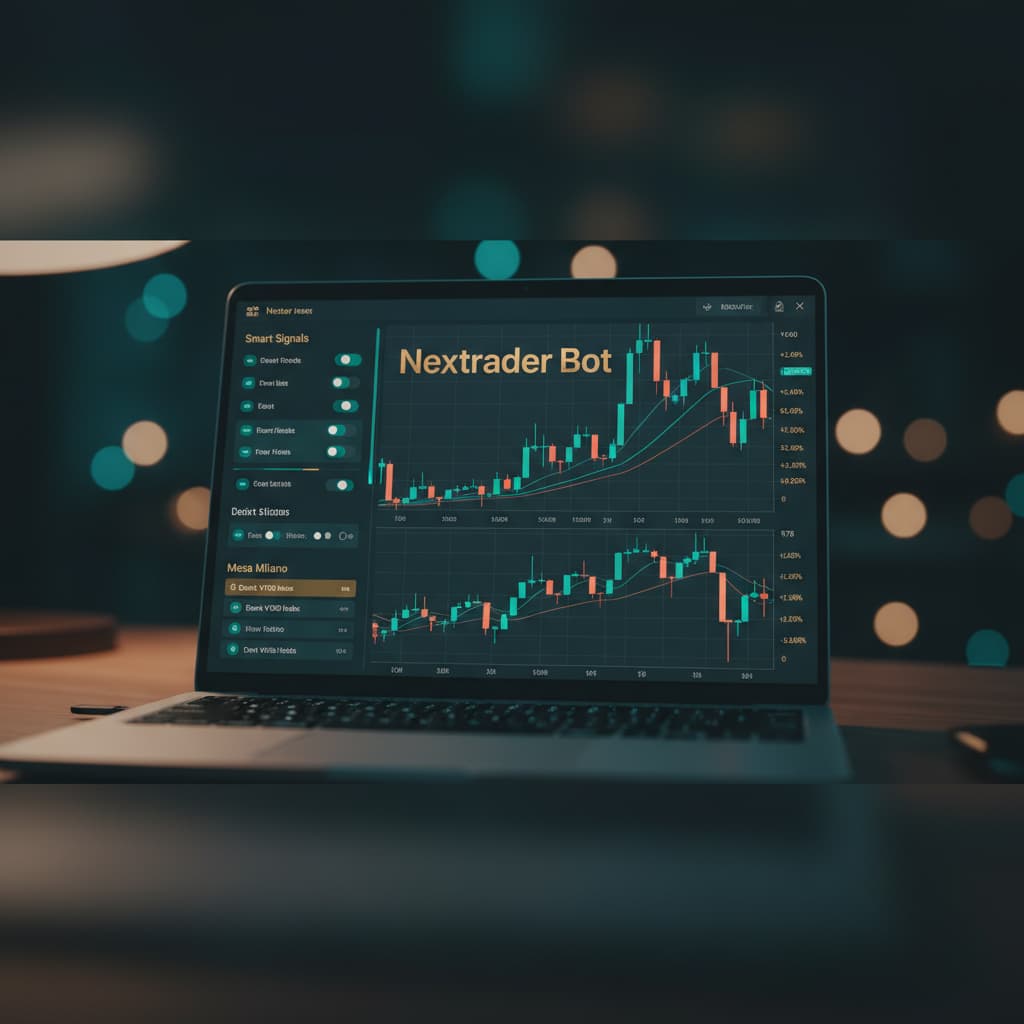
3. Access the Auto Trader Bot: Once logged in, look for the "Auto Trader Bot" section in the navigation menu. This is where you'll configure all your automated trading strategies.
4. Connect Deriv Account: Within the Auto Trader Bot interface, you'll see an option to connect your Deriv account. Click on it. Nextrader uses Deriv's secure OAuth flow. You'll be redirected to Deriv.com to grant Nextrader (using App ID 67545) permission to trade on your account. This is a standard and secure process. You can connect multiple Deriv accounts if you manage several, thanks to Nextrader's multi-account support. Choose whether you want to trade on your real or demo account for this session. For initial testing, we highly recommend starting with a demo account.
Step 2: Selecting Market, Contract Type, and Strategy
With your Deriv account connected, it's time to define what you want to trade and how. This step involves selecting the specific market, contract type, and the core AI strategy that will drive your bot.
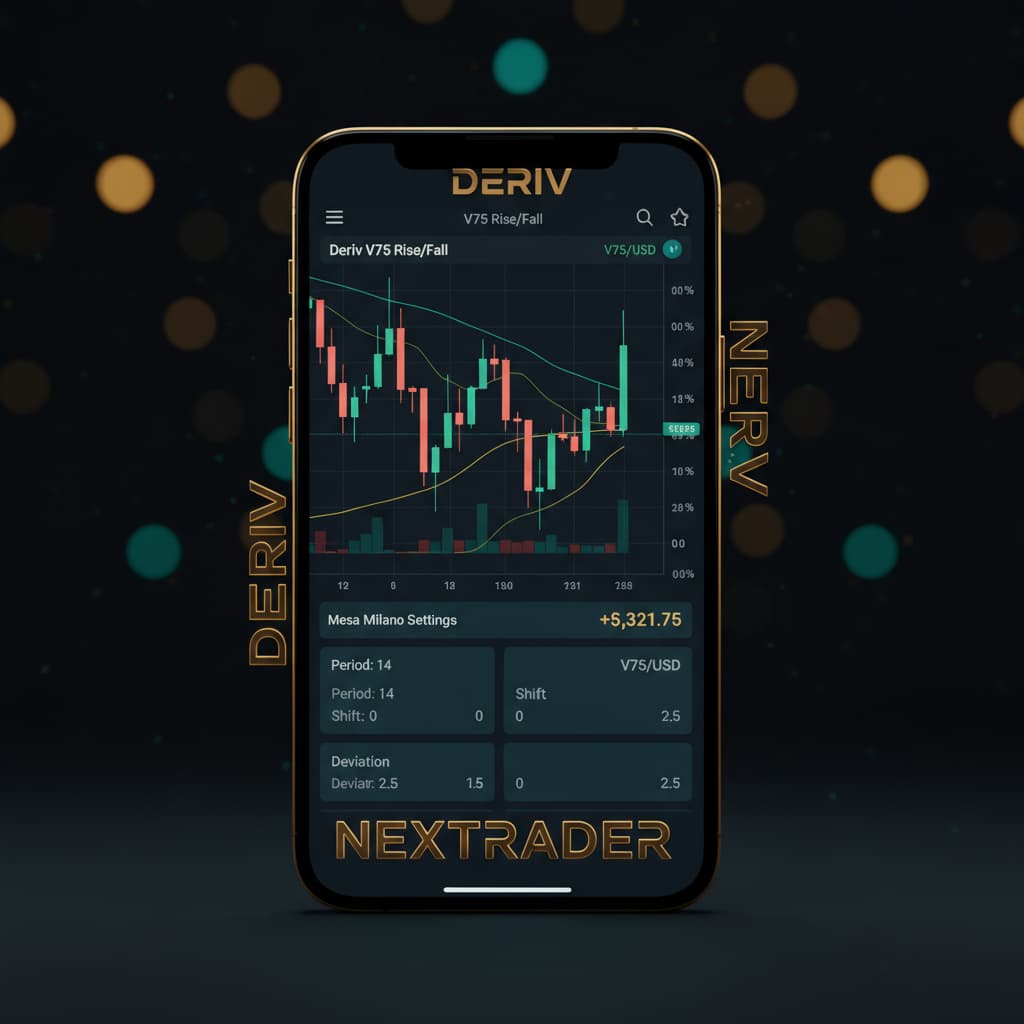
1. Choose Your Market: In the Auto Trader Bot interface, locate the "Market" selection. Our focus for this tutorial is Volatility Indices. From the dropdown, select "V75". Nextrader supports a wide range of markets including V10/V25/V50/V75/V100 + 1Hz, Forex, Gold, Silver, and Crypto, making it a versatile platform for various binary bots and automated trading needs.
2. Select Contract Type: Next, choose the "Contract Type". For this tutorial, we are automating "Rise/Fall" contracts. These are popular for their straightforward nature: predict if the asset price will rise or fall relative to the entry price.
3. Implement Volatility Pulse: Now for the core of our automation – the strategy. Under "AI Strategies", select "Volatility Pulse (Bollinger Bands)". This is one of Nextrader's 11 named AI strategies, specifically designed to identify potential trend reversals or continuations based on market volatility, as indicated by Bollinger Bands. It generates real-time non-repaint trading signals, meaning signals only fire on CLOSED candles, ensuring reliability.
4. Set Timeframe: Nextrader offers signals across 4 timeframes: 5min, 10min, 30min, and 1 hour. For V75, a 5min or 10min timeframe often provides a good balance between signal frequency and reliability. Choose your preferred timeframe; for instance, let's select "5min".
Step 3: Configuring Volatility Pulse and Trade Parameters
This step involves fine-tuning the Volatility Pulse strategy and setting the specific parameters for each trade your bot will execute. These settings directly influence when and how your bot enters and exits positions.
1. Strategy Settings (Volatility Pulse): While the core logic of Volatility Pulse (Bollinger Bands) is predefined, Nextrader allows you to set a minimum "Confidence Level" for signals. Nextrader provides confidence levels per signal (ranging from 30–85%), indicating the strength of the signal. For initial testing, you might start with a moderate confidence level, say "60%". This ensures your bot only acts on stronger signals where at least 3-4 indicators agree, a hallmark of Nextrader's Smart Signals.
2. Initial Stake: Determine your base trade amount. This is the amount your bot will stake on the first trade of a new sequence. Start with a small amount, especially on a real account, to manage risk effectively. For example, set this to "1.00 USD".
3. Contract Duration: Define how long each Rise/Fall contract will last. You can choose between "Ticks" or "Minutes". For V75, "1 Minute" or "5 Ticks" are common durations. Let's select "1 Minute" for this example.
4. Stop Loss (SL): This is a critical risk management tool. Set a maximum amount your bot is allowed to lose before it pauses trading. For example, "100.00 USD". Nextrader's live P&L tracking will monitor this in real-time.
5. Take Profit (TP): Set a target profit amount. Once your bot reaches this profit, it will stop trading for the session. You can set a single "Take Profit 1" (e.g., "20.00 USD") or also define "Take Profit 2" for more advanced scaling strategies. Nextrader shows Entry price, Stop Loss, Take Profit 1 & 2 for each signal, giving you full transparency.
Step 4: Implementing Mesa Milano Money Management
Money management is paramount in automated trading. Nextrader offers several robust options, and for this tutorial, we'll leverage the intelligent "Mesa Milano" system for smart loss recovery.
1. Navigate to Money Management: Within the Auto Trader Bot configuration, locate the "Money Management" section.
2. Select Mesa Milano: From the available options (which include Fixed Stake and Martingale), choose "Mesa Milano (smart loss recovery)". Mesa Milano is one of Nextrader's advanced money management algorithms, designed to recover losses efficiently without the aggressive exponential staking often associated with Martingale. It intelligently adjusts stake sizes based on recent performance, aiming for a quicker recovery of losses while minimizing exposure.
3. Configure Mesa Milano Parameters:
* Base Stake: This is the initial stake for a new sequence, which you already set in Step 3 (e.g., "1.00 USD"). Ensure consistency.
* Max Loss Recovery Multiplier: This parameter controls how aggressively Mesa Milano tries to recover losses. A higher multiplier means quicker recovery but also higher potential stakes. A lower multiplier is more conservative. For instance, you might start with a multiplier of "2.0x" or "2.5x". This means if a trade loses, the next stake will be calculated to recover the loss plus a small profit, up to 2 or 2.5 times the base stake in potential increase.
* Max Number of Trades in a Sequence: Set a limit on how many consecutive trades Mesa Milano will attempt to recover losses. This prevents the bot from chasing losses indefinitely. For example, "5" or "7" trades.
* Reset on Profit: Ensure this option is enabled. This means that after a successful trade (a profit), the Mesa Milano sequence resets to the Base Stake, starting fresh.
By carefully configuring Mesa Milano, you're adding a layer of sophisticated risk and reward management to your deriv bots, making your trading more resilient and strategic.
Step 5: Reviewing, Activating, and Monitoring Your Bot
You're almost ready to go live! This final step involves a thorough review of all your settings, activating your bot, and understanding how to monitor its performance using Nextrader's powerful real-time tools.
1. Thorough Review: Before activating, carefully review every setting you've configured:
* Deriv Account: Ensure you're connected to the correct account (demo or real).
* Market: V75
* Contract Type: Rise/Fall
* Strategy: Volatility Pulse (Bollinger Bands)
* Timeframe: (e.g., 5min)
* Confidence Level: (e.g., 60%)
* Initial Stake: (e.g., 1.00 USD)
* Contract Duration: (e.g., 1 Minute)
* Stop Loss & Take Profit: Your defined limits.
* Money Management: Mesa Milano with its specific parameters.
Making sure these are all correct is crucial for the optimal functioning of your binary bots.
2. Activate Your Bot: Once you are satisfied with all the settings, locate and click the "Start Bot" button. Your Nextrader bot will now begin listening for Volatility Pulse signals on V75 for Rise/Fall contracts on your chosen timeframe and confidence level. When a signal meets your criteria, it will automatically place a trade on your connected Deriv account, applying the Mesa Milano money management logic.
3. Monitor Performance: Nextrader provides a real-time color-coded trading console where you can see every trade executed by your bot, its outcome, and the current live P&L tracking. This console gives you immediate feedback on your bot's performance. Pay attention to the win rate, the sequence of wins and losses, and how Mesa Milano is adjusting stakes.
4. Adjust and Optimize: Automated trading is an iterative process. Continuously monitor your bot's performance. If you notice it's not performing as expected, pause the bot, adjust parameters (e.g., confidence level, Mesa Milano multiplier, Stop Loss/Take Profit), and restart. You might find that different market conditions require slight tweaks to your strategy.
Pro Tips
1. Start with Demo Accounts: Always begin testing any new deriv bot configuration on a Deriv demo account. This allows you to understand how the Volatility Pulse strategy interacts with V75 and how Mesa Milano manages your capital without risking real funds.
2. Understand Signal Behavior: Before automating, spend some time observing the Volatility Pulse signals manually on Nextrader's main dashboard or by subscribing to our Telegram signals at t.me/nextraderlive. This will give you a better feel for their frequency and accuracy, which fire on 30 markets every 5 minutes, up to 30 signals/day.
3. Experiment with Confidence Levels: If your bot isn't trading frequently enough, consider slightly lowering the minimum confidence level. If it's trading too often with poor results, increase it. Finding the sweet spot is key to optimizing your deriv trading tools.
4. Explore Other Strategies: Nextrader offers a suite of 11 AI strategies. Don't limit yourself to just Volatility Pulse. Experiment with others like Trend Hunter (EMA crossover), Reversal Radar (RSI), Momentum Wave (MACD), Swift Scalper (Stochastic RSI), or the robust Smart Fusion (multi-indicator) and Smart Signals (4+ indicators) for different market conditions or assets.
5. Strict Risk Management: Even with Mesa Milano, never trade with funds you cannot afford to lose. Always set a realistic Stop Loss and manage your Mesa Milano parameters conservatively, especially when you are new to automated trading.
Start Trading Now
Ready to experience the power of automated trading? Head over to app.nextrader.live to set up your free account, or sign up directly at app.nextrader.live/signup. For real-time signals and community insights, join our Telegram channel at t.me/nextraderlive.
Trading involves risk. Past performance does not guarantee future results.