Introduction
Welcome to this comprehensive Nextrader tutorial! If you’re looking to elevate your trading experience on Deriv, particularly with the Volatility 100 Index (V100), you’ve come to the right place. This guide will walk you through the precise steps to automate your Deriv V100 Rise/Fall contracts using Nextrader's powerful Auto Trader Bot. We’ll focus on leveraging the sophisticated "Trend Hunter" AI strategy, combined with the intelligent "Mesa Milano" money management system, to create a robust automated trading setup.
This tutorial is designed for both novice and experienced traders who want to harness the power of automation and advanced deriv trading tools. By the end of this guide, you will have successfully configured Nextrader to execute trades on your behalf, allowing you to capitalize on V100 market movements without constant manual intervention. Get ready to transform your trading approach with one of the most effective deriv bots available.
Nextrader offers 100% free access to all its features, meaning no subscriptions or paywalls will hinder your journey to automated trading success. Our real-time non-repaint trading signals, which only fire on closed candles after a minimum of 3-4 indicators agree, ensure reliability. With 4 timeframes (5min, 10min, 30min, 1 hour) and a wide range of markets including Volatility Indices, Forex, Gold, Silver, and Crypto, Nextrader is your ultimate partner for smart trading.
What You Need Before Starting
Before we dive into the setup, ensure you have the following ready:
Get Live AI Trading Signals
Real-time non-repaint signals powered by 11 professional AI strategies. Volatility Indices, Forex, Gold & Crypto — no subscription, no paywall.
- Auto Trader Bot
- Digit Trader Bot
- 11 AI Strategies
- Live Telegram Signals
- A Deriv Account: Both a real or demo account will work. For this tutorial, we highly recommend starting with a demo account to test your settings thoroughly before risking real capital.
- A Nextrader Account: If you don't have one, sign up for free at app.nextrader.live/signup. All features are unlocked from day one.
- Basic Understanding of Deriv Rise/Fall Contracts: Familiarity with how Rise/Fall contracts work on Deriv is beneficial.
- An Internet Connection: A stable connection is crucial for seamless bot operation.
Step 1: Connect Your Deriv Account to Nextrader
The first crucial step is to securely link your Deriv account to Nextrader. This allows our platform to execute trades on your behalf using its powerful deriv bots.
1. Log In to Nextrader: Go to app.nextrader.live and log in with your credentials. If you're a new user, complete the quick and free signup process.
2. Navigate to Account Settings: Once logged in, look for the "Account" or "Profile" section, typically found in the top right corner or a sidebar menu. Click on it to access your account settings.
3. Generate Deriv API Token:
* Open a new tab and log in to your Deriv account.
* Go to "Settings" > "API Token" (or search for "API Token" in Deriv's search bar).
* Click "Create a new token".
* Crucially, ensure you grant the necessary permissions: At a minimum, select "Read" and "Trade" permissions. Without "Trade" permission, Nextrader cannot place orders. You can also add "Payments" if you plan to use withdrawal features directly through an API, but for automation, "Read" and "Trade" are essential.
* Give your token a descriptive name (e.g., "Nextrader Bot").
* Click "Create". Copy the generated token immediately, as it will only be shown once.
4. Paste API Token into Nextrader:
* Return to your Nextrader account settings.
* Locate the field for "Deriv API Token" or "Connect Deriv Account".
* Paste the copied API token into this field.
* Click "Connect" or "Save".
5. Verify Connection: Nextrader will attempt to connect to your Deriv account. Upon successful connection, you will see your Deriv account balance (demo or real) displayed within the Nextrader dashboard, confirming that the multi-account support is active and ready for trading. This secure link is the foundation for all your automated binary bots operations.
Step 2: Navigate to the Auto Trader Bot and Select V100
With your Deriv account successfully connected, it's time to set up the specific market and contract type for automation.
1. Access the Auto Trader Bot: From the Nextrader dashboard, locate and click on the "Auto Trader Bot" option. This is where you'll configure all your automated trading strategies and money management settings.
2. Select Market Category: Within the Auto Trader Bot interface, you'll see a list of available market categories. Click on "Volatility Indices".
3. Choose V100: From the list of Volatility Indices, select "V100" (Volatility 100 Index). This is a highly popular synthetic index known for its consistent volatility, making it an excellent candidate for automated strategies. Nextrader supports V10/V25/V50/V75/V100 and 1Hz indices, offering a broad range for your deriv trading tools.
4. Confirm Contract Type: Ensure that "Rise/Fall" is selected as the contract type. This is the default and the focus of our tutorial. Rise/Fall contracts are straightforward: you predict whether the price will end higher or lower than the entry price after a specified duration.
5. Set Trade Duration (Optional Initial Setting): While the bot will manage entry and exit, you might see an initial duration setting. For V100 Rise/Fall, common durations range from 1 minute to 5 minutes. You can start with a 1-minute duration, but the strategy's timeframe will heavily influence optimal trade duration.
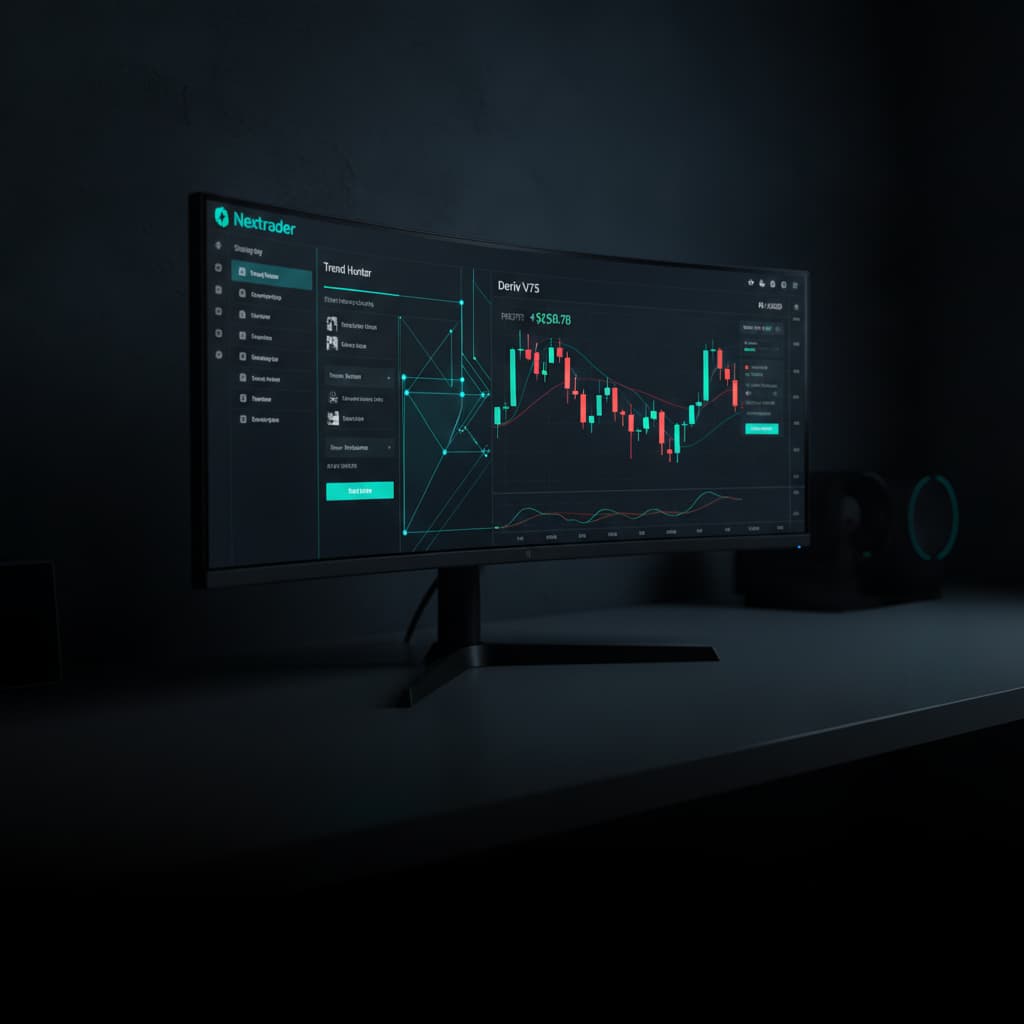
Step 3: Configure the Trend Hunter Strategy
Now, let's empower your Auto Trader Bot with the intelligence of the "Trend Hunter" strategy. This is one of Nextrader's 11 named AI strategies designed to identify strong directional movements.
1. Select AI Strategy: Within the Auto Trader Bot settings, locate the "AI Strategies" section. Click on the dropdown menu and choose "Trend Hunter".
2. Understand Trend Hunter: The Trend Hunter strategy is built around EMA (Exponential Moving Average) crossovers. It's designed to catch the beginning of new trends and ride them for profit. When a shorter EMA crosses above a longer EMA, it signals an upward trend (Rise). Conversely, when a shorter EMA crosses below a longer EMA, it signals a downward trend (Fall). This strategy is excellent for capturing momentum in volatile markets like V100.
3. Choose a Timeframe: Nextrader offers signals across 5min, 10min, 30min, and 1-hour timeframes. For V100, which is highly dynamic, starting with a 5min or 10min timeframe is often a good balance between signal frequency and reliability. Experimentation is key here; a 30min or 1-hour timeframe might provide fewer but potentially stronger signals, suitable for longer trade durations. Select your preferred timeframe for the Trend Hunter strategy.
4. Set Confidence Level: Nextrader signals come with a "Confidence Level" ranging from 30% to 85%. This indicates the strength and agreement of the underlying indicators (minimum 3-4 indicators must agree for a signal to fire). For automated trading with Trend Hunter on V100, a good starting point for the confidence level would be between 60% and 75%. A higher confidence level means the bot will only take trades when the signal is stronger, potentially reducing trade frequency but aiming for higher quality entries.
5. Review Signal Details: While the bot automates entries, Nextrader's signals always show the Entry price, Stop Loss, and Take Profit 1 & 2. The bot will use these underlying parameters to manage the automated trades, but you don't need to configure them manually for this setup.
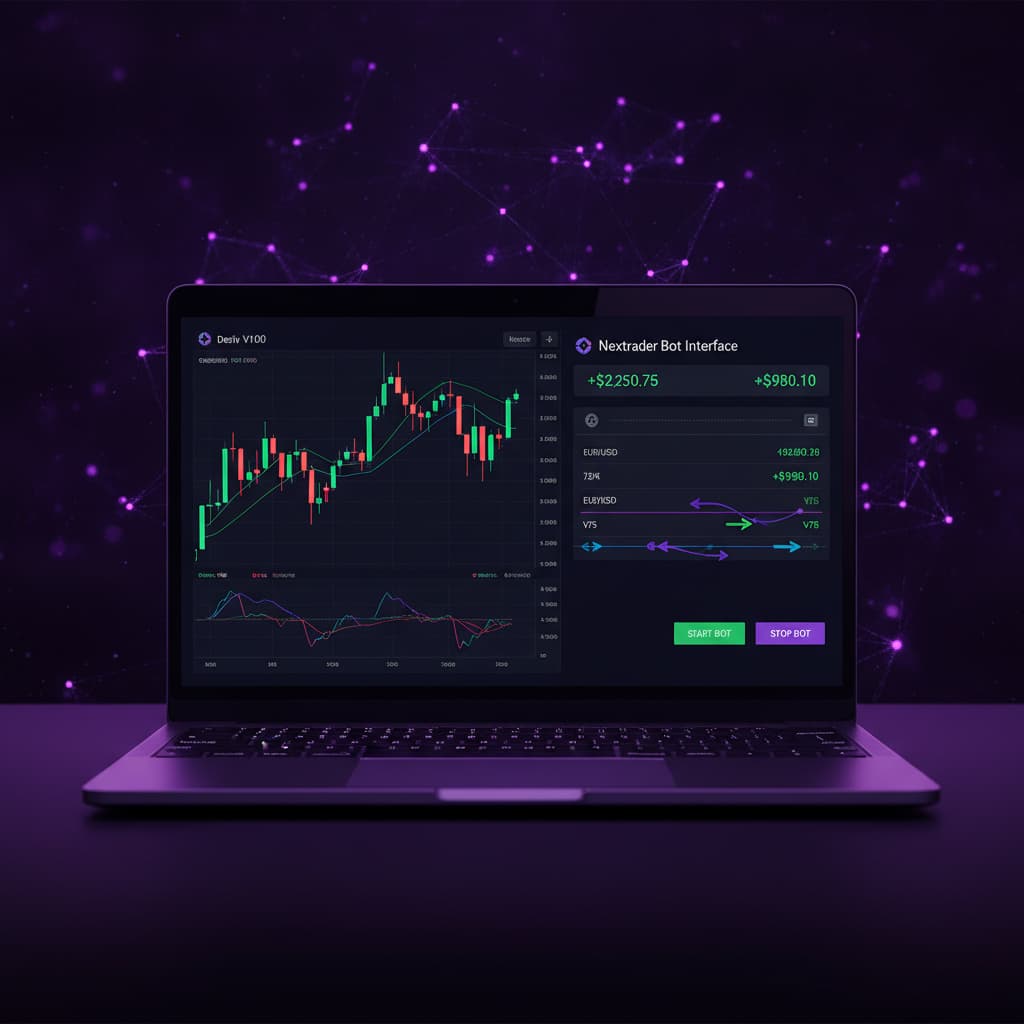
Step 4: Implement Mesa Milano Money Management
Money management is paramount to long-term success in trading. Nextrader's "Mesa Milano" strategy is an advanced loss recovery system that goes beyond simple Martingale.
1. Select Money Management: In the Auto Trader Bot settings, find the "Money Management" section. Click on the dropdown menu and select "Mesa Milano".
2. Understand Mesa Milano: Unlike Martingale, which simply doubles the stake after a loss, Mesa Milano is a "smart loss recovery" system. It calculates the optimal stake size needed to recover previous losses with a small profit, taking into account the contract's payout percentage. This approach aims to recover losses more efficiently and with less aggressive capital exposure than traditional Martingale, making it a powerful feature for your deriv trading tools.
3. Set Initial Stake: This is the amount you want to risk on your first trade. Start with a small, manageable amount, especially when testing on a real account. For example, $0.35 or $1.00. This is crucial for managing risk, particularly with volatility indices.
4. Configure Mesa Milano Parameters:
* Recovery Multiplier: This factor determines how much additional profit you aim for on a recovery trade beyond just covering losses. A common starting point is 1.05 to 1.10 (meaning aiming for 5-10% profit on the recovery).
* Max Loss Limit: This is a critical safety feature. Set a maximum cumulative loss amount that, if reached, will stop the bot. For example, if your account is $100, you might set a max loss limit of $10 or $20. This prevents significant drawdowns during prolonged losing streaks.
* Max Recovery Steps: Define how many consecutive recovery steps Mesa Milano should attempt before resetting or stopping. This limits the compounding risk during extended drawdowns.
5. Capital Preservation: Always remember that while Mesa Milano is smart, no money management strategy guarantees profits. It's a tool to manage risk and recover losses systematically, but setting appropriate initial stakes and max loss limits is vital for preserving your capital.
Step 5: Review Settings and Start Automation
You're almost there! A final review of your configurations will ensure everything is set up correctly before you unleash your automated deriv bots.
1. Comprehensive Review: Carefully go through all the settings you've configured:
* Market: V100
* Contract Type: Rise/Fall
* AI Strategy: Trend Hunter
* Timeframe: (e.g., 5min, 10min)
* Confidence Level: (e.g., 60-75%)
* Money Management: Mesa Milano
* Initial Stake: (e.g., $0.35 - $1.00)
* Mesa Milano Parameters: Recovery Multiplier, Max Loss Limit, Max Recovery Steps.
2. Verify Account Balance: Double-check that the correct Deriv account (demo or real) is selected and that you have sufficient balance for your chosen initial stake and potential Mesa Milano recovery steps.
3. Understand the Trading Console: Nextrader features a "real-time color-coded trading console" that will display all your bot's activities: signals received, trades placed, outcomes, and live P&L tracking. Familiarize yourself with this console; it's your window into the bot's performance.
4. Start with Demo First: This cannot be stressed enough. Before deploying on a real account, always run your bot on a Deriv demo account for several hours or even days. This allows you to:
* Validate your strategy settings.
* Observe the frequency and quality of signals.
* Test the Mesa Milano recovery mechanism in various market conditions.
* Adjust your initial stake and risk parameters without financial risk.
5. Initiate Automation: Once you are confident with all your settings and have thoroughly tested on a demo account, click the "Start Bot" or "Enable Automation" button within the Auto Trader Bot interface.
6. Monitor and Adjust: Even with automation, regular monitoring is crucial. Keep an eye on the trading console and your live P&L tracking. Market conditions change, and what works today might need adjustments tomorrow. Be prepared to pause the bot and fine-tune your settings (timeframe, confidence level, Mesa Milano parameters) as needed.
Pro Tips
1. Experiment with Timeframes: While a 5min or 10min timeframe is a good starting point for V100 with Trend Hunter, try other timeframes like 30min or 1 hour. Different timeframes can reveal different trend dynamics and may suit various market conditions or trade durations better.
2. Dynamic Confidence Levels: Don't set your confidence level and forget it. In volatile markets, a higher confidence (e.g., 75-85%) might be ideal. During calmer periods, you might lower it slightly (e.g., 55-65%) to increase signal frequency, but always with caution.
3. Explore Other AI Strategies: Nextrader offers 11 distinct AI strategies. While Trend Hunter is excellent for momentum, consider testing others like "Reversal Radar" (RSI-based), "Momentum Wave" (MACD-based), or even "Smart Fusion" (multi-indicator) on V100 or other markets. Each strategy has its strengths, and a diversified approach across multiple deriv bots can be beneficial.
4. Leverage Telegram Signals: Supplement your bot's activity by joining the Nextrader Telegram channel at Telegram. You'll receive up to 30 real-time signals per day across 30 markets, including V100, every 5 minutes. These can be used for manual trading or to provide additional insights into market sentiment while your bot runs automatically.
Start Trading Now
Ready to experience the future of automated trading? Head over to Nextrader App to log in, or sign up for your free account at Sign Up Free — Nextrader. Don't forget to join our community and get real-time signals on Telegram at Telegram.
Trading involves risk. Past performance does not guarantee future results.